Table of Contents
List of Figures
List of Tables
Table of Contents
This manual describes the installation process for the Network Intelligence software.
The following chaptesr explain the steps involved to install Network Intelligence. The various components of the software will either accompany this documentation, or will be available from the website http://www.gadgets.co.nz. While it is possible to install all three components (collector, server and client) of the software on the same machine, this is not recommended for anything but the smallest network (less than five Netflow producing routers).
The software is comprised of three parts which interact together on order to provide the full functionality of the software.
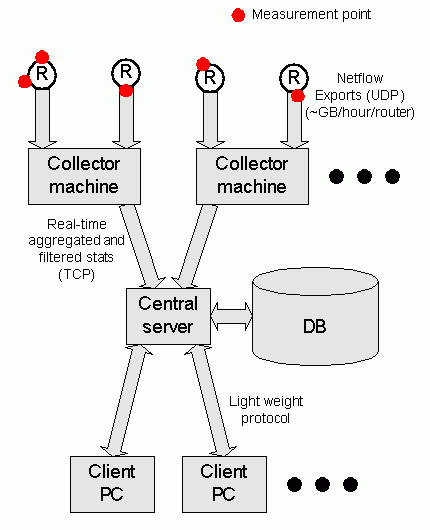
The collector accepts Netflow Exports, filters and aggregates them before sending them to the server. Ideally the collector should be placed close (network-wise) to the routers or devices producing the Netflow Exports.
The server carries out a number of tasks. Firstly, it accepts statistics from the collector. Secondly, it stores those statistics into a database. Thirdly, it generates a 3D representation of the network topology and traffic based on statistics retrieved from the database. This 3D representation is sent to the client.
The client accepts a 3D representation from the server which it then displays on the screen for the end user to view.
There are a number of requirements in order to run Network Intelligence.
Network Intelligence is a network measurment and visualisation tool so it is quite obvious that some way of measuring network traffic is required. There are two possibilities here. Netflow Exports and SNMP are both supported. Netflow exports are produced by most of the newer Cisco routers as well as Juniper, Foundry Networks, Enterasys kit. SNMP statistics on the other hand are available from virtually all network devices, so it is rather more likely you will have access to SNMP statistics than Netflow Exports. The big disadvantage with SNMP statistics is that they contain a small fraction of the information present in a netflow export. The upshot is that it's not possible to visualise the way in which traffic flows off of your network using OSPF statistics alone.
The basic requirement is to be running x86 compatible hardware. The individual components of Network Intelligence have their own special requirement as follows.
Collector. Typically minimal requirements. The primary bottlenecks are likely to be CPU and memory. A 233MHz Pentium class machine with 128MB RAM should suffice. Significant disk space or speed of access is not required.
Server. The disk access subsystem will likely be the primary bottleneck, then CPU. A 1GHz Pentium class machine with 512MB RAM should suffice. If possible the disk subsystem should have a caching controller. Network Intelligence can support striping of data across multiple devices so multiple drives can be effectively used without controller support. Disk size requirements will vary according to the network however a few GB should be enough for a while.
Client. Any machine that works well for games should also work well for the client software. Speed of the graphical subsystem is the primary bottleneck. A typical machine would be a 1GHz Pentium class with 128MB RAM and accelerated graphics. No significant disk space or speed of access is required.
The collector component is responsible for collecting Netflow Exports, and for their subsequent filtering and aggregation.
The client software is distributed in an archive called ni-collector-x.y.z.tgz, where x, y, and z make up the version number. To extract it chant the following command:
gtar xvfz ni-collector-x.y.z.tgz
A directory ni-collector-x.y.z will automatically be created and populated with files extracted from the archive. Be sure to read the copyright.txt and readme.collector files. These may contain last minute notes of interest.
Before installation it is worth giving some thought to the user the software should run as. Most systems already have a nobody user and in most cases it is ok to use that. If you do wish to create an alternative user (for example a user called traffic), do it now.
An installation script install.collector is provided to install the files into their correct locations. You should run this as the root user. The script will prompt you for a user to run the program as. At this point you should enter the name of the user you just created (or nobody if the case may be).
[root@rh72 ni-collector-2.0.1a]# ./install.collector
Welcome to the Network Intelligence COLLECTOR installation script.

This script will create directories /opt/ni/bin and
/etc/opt/ni and populate both of these with files.
It will then create rc scripts to start the software automatically.

For security reasons it is best if the software is owned and run
by a user other than root.  Most systems have a user called nobody
that is safe to use.  Note: if you are installing both the
SERVER and COLLECTOR software on the same machine, you should
use the same user for both.

Enter name of user the collector is to run as (eg. nobody): nobody
The installation is very fast, and all going well the software will be installed and rc scripts and links will be automatically installed to run the software on startup.
Edit the configuration file /etc/opt/ni/collectord.conf and make sure that all the fields you will be using have some value specified.
You need to specify a secret for each collector. This should be the same on each collector, and on the central server. Make sure you change it from the default setting otherwise you risk unauthorisaed access to the collector!
The user you want the collector to run as should also be specified. This is the same as the name you gave to the installation script.
Optional, and not normally used. An export target can be specified. It is usually safe to leave this commented out. It is only used when a collector is required to re-export Netflow Exports to another machine, such as a CFLOWD collector. CFLOWD is an entirely different application to Network Intelligence however they both process the same statistics, Netflow Exports. Refer to www.caida.org for more information on CFLOWD.
After saving the file you should be ok to start the collector software. The directory containing the script for starting and stopping the collector will vary from system to system. Typically either /etc/rc.d/init.d or /etc/init.d will be used. To start the collector you will need to chant something like:
[root@rh72 ni-collector-2.0.1a]# /etc/rc.d/init.d/colld start
Starting collectord:                                       [  OK  ]
Check your syslog to see if there are any unexpected messages. All going well the collector software will now be running. You can perform a basic test by using telnet to connect to the collector. The following command can be used:
[root@rh72 ni-collector-2.0.1a]# telnet localhost 6699
The response will be something like:
Trying 127.0.0.1...
Connected to localhost.
Escape character is '^]'.
<session>
<authentication><challenge>mUsqUSinAEBIdyiu</challenge></authentication>
If you get some sort of response mentioning authentication and challenge that is a good sign that everything is working correctly. After a few seconds that connection will time out and you will be returned to the command prompt.
The collector is now installed and no further maintenance of that component should be required.
Table of Contents
The server component accepts processed statistics from the collectors and places them in a database. The server also maintains connections with the clients, sending each client details of the 3D network environment based on data extracted from the database.
The server software is distributed in an archive called ni-server-x.y.z.tgz, where x, y, and z make up the version number. To extract it chant the following command:
gtar xvfz ni-server-x.y.z.tgz
As with the collector a directory called ni-server-x.y.z will automatically be created and populated with files extracted from the archive. Be sure to read the copyright.txt and readme.server files that may contain last minute notes of interest and relevance.
Before installation it is worth giving some thought to the user the software should run as. If you are installing the collector and server software on the same machine, please use the same user as you did for the collector installation.
Most systems already have a nobody user and in most cases it is ok to use that. If you do wish to create an alternative user (for example a user called traffic), do it now.
An installation script install.server is provided to install the files into their correct locations. You need to run this installation script as root. The script will prompt you for a user to run the program as. If in doubt, a user nobody is usually available. Check your /etc/passwd file for a list of possible users if in doubt.
Caution!
Running the program as root is generally considered to be a bad idea.
[root@rh72 ni-server-2.0.1a]# ./install.server
Welcome to the Network Intelligence SERVER installation and upgrade script.

This script will create directories /opt/ni/bin, /etc/opt/ni
/var/opt/ni and /var/opt/ni/database.  It will then place several files into
the /opt/ni/bin and /etc/opt/ni directories.
It will then create rc scripts to start the software automatically.

For security reasons it is best if the software is owned and run
by a user other than root.  Most systems have a user called nobody
that is safe to use.  Note: if you are installing both the
SERVER and COLLECTOR software on the same machine, you should
use the same user for both.

Enter name of user the server is to run as (eg. nobody):
The installation is very fast, and all going well the software will be installed and scripts and links will be installed to run the software on startup.
Instructions and a reminder to edit the coniguration file are displayed on the screen.
Please edit the /etc/opt/ni/nid.conf configuration file.  The file contains
guidelines for site-specific settings, and other details such as
LICENCE KEYS THAT NEED TO BE CORRECTLY ENTERED BEFORE THE SOFTWARE
WILL RUN!

After editing the configuration file it is wise to run the
server manually in order to confirm everything is running properly.
You can do this by entering the following command:

    /opt/ni/bin/networkintelligenced -i

If there aren't any errors reported you should be ok to run the
server as a daemon.  Use the nid rc script to do this, or reboot
the machine to have it run automatically.

This completes the installation of the server portion of Network Intelligence.
Edit the configuration file /etc/opt/ni/nid.conf and go through each line one at a time to confirm the parameters are set correctly. The file is self documenting and the function of each parameter should be self-explanatory. Of particular importance is the specification of the server licence in the file. The licence dictates how many routers the software supports and its expiry date. In most situations a demonstration licence will have been made available from the download area of the http://www.gadgets.co.nz website. You will need to copy this licence into the nid.conf file.
Please note:
This section can be skipped if you are not going to be gathering Netflow Exports.
You will need to obtain from your network a dump of the BGP routing table. If you are using Cisco routers, the following command (in enable mode) can be used to retrieve this information.
Caution:
The output from the command may be a few megabytes in size!
term len 0
show ip bgp
The format of the BGP file is as follows
*>i<destination_network/netmask> <next_hop> <cost>
 <AS_path> i
                            .
                            .
                            .
Example:
*>i192.168.14.0     192.168.10.45  100  0 3 16 i
*>i192.168.15.0/24  192.168.10.41  100  0 12 i
*>i192.168.16.0/24  192.168.10.45  100  0 3 16 21 i
Please note:
destination_network is specified with an optional netmask. next_hop is the IP address of a router in your network. AS_path is the path of ASes taken to reach the destination network
Place the output into the BGP routing table file /etc/opt/ni/bgp.txt.
Please note:
This section can be skipped if you are not going to be gathering Netflow Exports.
For the SNMP information you will need to obtain mappings between router interfaces and the ifIndex number of those interfaces. Exactly where this information can be obtained is highly specific to your network. It's quite possible that whatever software you are using to monitor the network (HP OpenView, Spectrum etc.) will be able to provide you with some raw text files with this information. You will then have to convert these raw files into some form readable by Network Intelligence Perl is a good choice for this kind of task.
The format of the required SNMP file is
Format:
<router_name>;<interface_name>;<ifIndex_number>
                  .
                  .
                  .
Example:
amsterdam1;serial1;1
amsterdam1;serial2;2
amsterdam2;serial1;10
geneva20;eth1;3
geneva20;eth2;4
geneva20;ser1;7
The SNMP ifIndex information is used to map from the Netflow Export statistics, which contain ifIndex numbers, to real interface names that can be displayed within the Network Intelligence software.
Once you have something in this format, place it into an SNMP file /etc/opt/ni/snmp.txt.
Please note:
This step is optional but will allow you to quickly build your network representation within Network Intelligence by importing router confuguration files directly rather than building each router by hand.
Copy your router configuration files to /etc/opt/ni/config. These are used to build the model of your network within Network Intelligence.
Network Intelligence is capable of importing configuration files from most models of Cisco router.
After completing all of the steps above you should be ok to start the server software. When running the server for the first time it is recommended to use the interactive option. This makes it a lot easier to identify problems when setting up the server. To start the server interactively from the command line chant the command:
[root@rh72 ni-server-2.0.1a]# /opt/ni/bin/networkintelligenced -i
Loading network representation...
Network representation loaded.
Network pointers set.
Generating OSPF routing tables.  This may take a while...
OSPF routing tables generated.
Loading BGP routing table...
BGP table loaded.
Starting multiple threads...
Server V2.0.1a (master mode) started
If everything goes smoothly with no errors, it's then quite safe to run the server as a daemon. Stop the command above (use ctrl-c). The directory containing the script for starting and stopping the server as a daemon will vary from system to system. Typically either /etc/rc.d/init.d or /etc/init.d will be used. To start the server you will need to chant something like:
[root@rh72 ni-server-2.0.1a]# /etc/rc.d/init.d/nid start
Starting networkintelligenced:                             [  OK  ]
Check your syslog to see if there are any unexpected messages. All going well the server software will now be running. You can perform a basic test by using telnet to connect to the server. The following command can be used:
[root@rh72 ni-server-2.0.1a]# telnet localhost 6700
The response will be something like:
Trying 127.0.0.1...
Connected to localhost.
Escape character is '^]'.
<session>
<software owner="non-commercial users until April 2003" version="2.0.1a"/>
<message><broadcast>This is the message of the day. Feel free to change me.</broadcast></message>
<authentication><challenge>efV4CJEqKexsXvil</challenge></authentication>
If you get something similar that is a good sign that everything is working properly.
Now is a good time to add some Network Intelligence users. These users are quite separate from the *nix concept of a user. They are used to control and restrict access to the Network Intelligence server. In order to successfully connect from the client sortware to the server you will need at least one user with admin level access.
For details on adding and removing users, please refer to the section called “User Access Control”.
Table of Contents
The client software makes heavy demands on the graphics capabilities of the machine it is running on. For this reason a workstation with high performance graphics is suggested. Such requirements are very similar to those presented by any of the currently popular 3D games (Quake, GTA3 etc.). Any machine that works well with such games will very likely work well with the Network Intelligence client. Running the client on an inferior machine will likely result in disappointment.
Download the .tgz archive and extract the files with the following command
gtar xvfz ni-client-x.y.z.tgz
A directory ni-client-x.y.z will automatically be created and populated with files extracted from the archive. Be sure to read the copyright.txt and vis.readme files. These may contain last minute notes of interest.
Install the software by running the installation script as follows. You will need to be root when you run the installation script.
./install.client
This will result in:
[root@rh72 ni-client-2.0.1a]# ./install.client
Welcome to the Network Intelligence CLIENT installation script.

This script will create a directory /opt/ni into
which the 3D libraries will be installed.  It will then
place several files into your /opt/ni/bin directory.

Press ENTER to continue, or ctrl-c to abort.
Installation is very fast and the script will return with the following when complete:
Done.
Enter /opt/ni/bin/go.vis to start the client.
An icon called ni_icon.png is included in the archive. Setting up the icon on your desktop varies between versions of GNU/Linux. This is left as an exercise for the reader.
The only other other thing to consider at this point is your version of Mesa. Network Intelligence relies heavily on OpenGL calls and hence running a reliable version of Mesa is very important. A number of different versions of Mesa have been tried with Network Intelligence, with varying results. Mesa 3.4.1 works well. Mesa 3.2 (which ships with RH6.2 as standard) for example will appear fine, but you will not be able to select any objects on the 3D window! In summary:
Table 3.1. Suitability of the different version of Mesa
| Version | Comment |
|---|---|
| 3.2 | Avoid - can't select any objects |
| 3.4.1 | OK - no fog for text, but otherwise OK |
| 3.4.2 | OK - no fog for text, but otherwise OK |
| 4.0 | Maybe - fog works for text, but objects appear white with (some?) S3 video cards |
| 4.0.2 | Maybe - works fine, but is VERY slow! |
| 5.0 | OK - fog works for text, some objects blink white sometimes, otherwise fine |
On a Red Hat GNU/Linux system you can check what version of Mesa is installed with the following command.
rpm -q Mesa
On other systems you can look at the /usr/lib/libGL* files and hopefully gleam some information from there. Look at /usr/lib/libGL.so and /usr/lib/libGL.so.1 in particular and see where they are pointing (they're usually a symbolic link). The following are common versions.
Table 3.2. Files relating to different versions of Mesa
| Filename | Version |
|---|---|
| libGL.so.1.2.030401 | 3.4.1 |
| libGL.so.1.2.030402 | 3.4.2 |
| libGL.so.1.3.402 | 4.0.2 |
| libGL.so.1.4.500 | 5.0 |
If you find you are running an unsuitable version, you can obtain a working version from the official Mesa website http://www.mesa3d.org
Feedback
If you have experiences (good or bad) with other versions we would appreciate your feedback to support@gadgets.co.nz
Complete compilation instructions for Mesa are included in the archive, however in most cases only three lines are required to install it. Before doing so, make sure you remove any old versions of Mesa that are still on your machine. For Red Hat systems the old version can be removed with:
rpm -e --nodeps Mesa
Mesa is compiled and installed with the following commands:
./configure --prefix=/usr
make
make install  (this line must be entered as root)
The client for Windows is distributed as a single self-extracting executable. The name is of the form nixyz.exe where x, y and z form the version number of the software.
Double-click on the executable to install it. The installation process will be explained step by step. A shortcut to the application will be added to your start menu, under programs.
Table of Contents
A number of smaller support aplications are supplied along with Network Intelligence. They are used for controlling access to the Network Intelligence server as well as debugging.
A small application called access_control is distributed in the server archive. This is used to administer the password file in order to limit who has access to connect to the Network Intelligence server. The usage is as follows.
[root@rh72 ni-server-2.0.1a]# ./access_control
Usage: ./access_control <-a|-d> [-f filename] <-u username> [-l access_level]
-f Specify an alternative Network Intelligence password file
   to the default /etc/opt/ni/access_file

-a Add a user with the specified username, to the Network
   Intelligence password file.  If they already exist in the
   file the current values will just be updated.

-d Delete the user with the specified username from the
   Network Intelligence password file.

-l Specify the access level when adding a user.  May be
   either USER or ADMIN.

Default access level is: USER
Example:
[root@tragula /root]# /opt/ni/bin/access_control -a -u demouser -l ADMIN
Enter password for user (will be echoed to screen): demopass
[root@tragula /root]#
Please note:
Users with admin level access will have complete control whereas user level allows viewing (but not editing) of the network representation.
A small application called bbnfc is distributed in the collector archive. It can be used to check for the presence of incomming Netflow Export packets on port 2055, or any other UDP port. To run it, simply chant:
./bbnfc
This small program can be very useful for debugging purposes. Particularly when you are not sure if a router is exporting Netflow Exports, or if you suspect the source IP address differs from what you expect. Network Intelligence only listens to traffic from IP addresses you configure so this small piece of information is vital to successfully gathering statistics.
Please note:
Make sure the collector software isn't running before you try to start the bbnfc software. It's not possible for both applications to bind to the same port at the same time.