
Not just LED lighting, but state of the art LED lighting
Introduction
Driving LEDs with the kind of power levels required to illuminate a room is not straight forward. LEDs need to be driven with a constant current, which at first can be a bit of a tricky concept to come to grips with. This board takes most of the difficult stuff out of the equation so that you can focus on other things - building an attractive light fitting, fiddling with dimming, fading effects, controlling your light from your cell phone - that sort of thing. Best of all the board is free! That's free as in beer. You can download the schematic and build your own if you want. You can even modify the design to make it better. Or you can just buy one ready assembled. The design is released under a Creative Commons license.
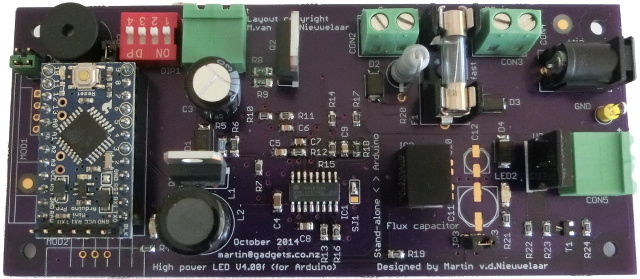
The board offers many features, but one of the great things about it is that it is extendable. Depending on what you require you might only need a board populated with a few components. It can be customised for your needs and to meet your budget.
At the heart of the board (shown above) is the afore mentioned constant current driver. This is a boost converter that takes a constant voltage input, say 12V, and boosts it to a higher voltage at a constant current. The LEDs I like to use run at 1A maximum, and at this operating point have around 30V across them, so 30W power dissipation. This is enough to illuminate a decent sized room of say 24 square metres (250 square feet).
At this point I should mention the power supply. You may be happy fiddling around with a lab or other bench top supply to power the driver board, but eventually you may want to run your light from, well, the light switch. The easiest solution here is to use a constant voltage supply and hide that away in your ceiling space, or perhaps build it into your light fitting. In this case the light switch controls the power to the constant voltage supply and that supply powers the LED driver board which in turn drives the LED. Meanwell offer a bewildering array of options for power supplies. I buy mine from Wellforces. I have standardised on using 24V supplies in my house as driving an LED that requires around 30V from a 24V supply is particularly efficient. I have measured 96% efficiency.
Getting back to the boost converter, this circuit steps up the constant voltage at the input to provide 1A at the output at around 30V. Other voltages and current levels for driving other LEDs are possible; please enquire if you have an LED with a particular requirement.
The boost converter plus a DC power supply is all you need to power your LED. The board could be assembled so and you could solder your power supply and LED wires on and the LED would shine fine and dandy. So what's all the other stuff for then? Well, to make life easier I added some input and output connectors as well as a fuse, but that's still not a lot. The major next addition is the Arduino Pro Mini module that's produced by SparkFun Electronics. By adding the Arduino we open up a whole world of possibilities!
Want to dim the LED using PWM? The Arduino can do it. Want your LED to fade in or out? The Arduino can do it. Of course we need a power supply for the Arduino so that's on the board too in the form of a switch mode DC/DC converter.
Once we have the Arduino being able to dim or turn things on and off we might want to control devices other than LEDs (remember they run on constant current not constant voltage like most other things). What if we have an LED that is designed to run off 12V? The type that come in the common MR16 format fit this description. Well there is an output on the board that lets you drive these too! Not only can you turn them on or off, but you can dim them too - just like the LED running off the constant current supply. Hoorah!
What you say? You want not to run a 12V LED but a 12V halogen globe? Well you can hook up one of those too. They use a truck load of power but might be useful if you want to use it as a heater. That's a joke. Ha ha. A 50W halogen pulls towards 5A at 12V which the board will happily handle if your power supply will deliver.
Maybe you want your light to be dimmed, or to fade in when you switch on the power, and if so then once again that's all you need. What say you would also like to control your light via RF remote control? There is a place on the board for an RF receiver. Some more code on the Arduino and now you can turn your light on or off using an RF key fob remote. Cool!
X-10 RF is a popular standard and X-10 compatible RF keychain fob remote controls are available off the shelf. Now X-10 has the concept of house codes and unit codes and so there are some DIP switches on the board for setting the house code. Now you can have different lights working independently with different keychain fob remotes.
So now you can turn your light on and off via remote and perhaps when you turn things on the light fades up nicely and when you turn off the light via the remote you can make the light fade out. But what happens when you flick off the light switch or power at the wall? The LED goes out immediately. So there's another option (they just keep on coming) for you to add a large external reservoir capacitor. One of around 33,000uF with a 35V rating will provide enough power for your LED to slowly ... fade ... out, when the light switch is turned off. Ooooh!
There are some extras like a buzzer and assorted input jumpers as well for setting various options but that's the crux of it. So there you go, an LED driver which can do more if you need it to (yes, it can power motorised curtains), or it can just turn and LED on and off.
Some specifications
- Power conversion can exceed 95% when running off 24V.
- Drives up to 30W of LEDs in a string. Single high efficiency LEDs can produce up to 3800 lumens from this level of power.
- Extreme dimming. Ratios exceeding 8000:1 - great for home theatre installations and other rooms where low level lighting is required.
- Drives 12V loads in the form of 12V LED lighting, halogens, strip lighting up to approximately 50W, more with extra heatsinking.
- Runs off DC. Typically 12V through to 24V. Great for off grid houses. Other ranges are possible. Please enquire.
- 433/315MHz ASK RF receiver. Talks X-10 RF and X-10 RF security protocols as standard. Other RF protocols often supported with just a software upgrade.
- Battery operation during power cuts. A DC jack can be used to quickly connect a battery (12-24V) to keep your lights running.
Download
The schematic is released under the Creative Commons share-alike 3.0 license. The board is copyright Martin van den Nieuwelaar. You may use it for non-commercial purposes. If you wish to use it commercially, please contact me and we can arrange something.
- V4.00 (latest free version) schematic, board on OSH Park, Eagle BOM, Digikey parts list.
Copyright 2015
Martin van den Nieuwelaar
Last updated 24 Jul 2017
